Hey guys today, we’re going to edit this photo of a little, what a droplet on a single blade of grass. Very peaceful. It’s an okay photo, but let’s try to make it better. Here’s how I decided how to edit macro photography in this instance.
Here’s the before image.
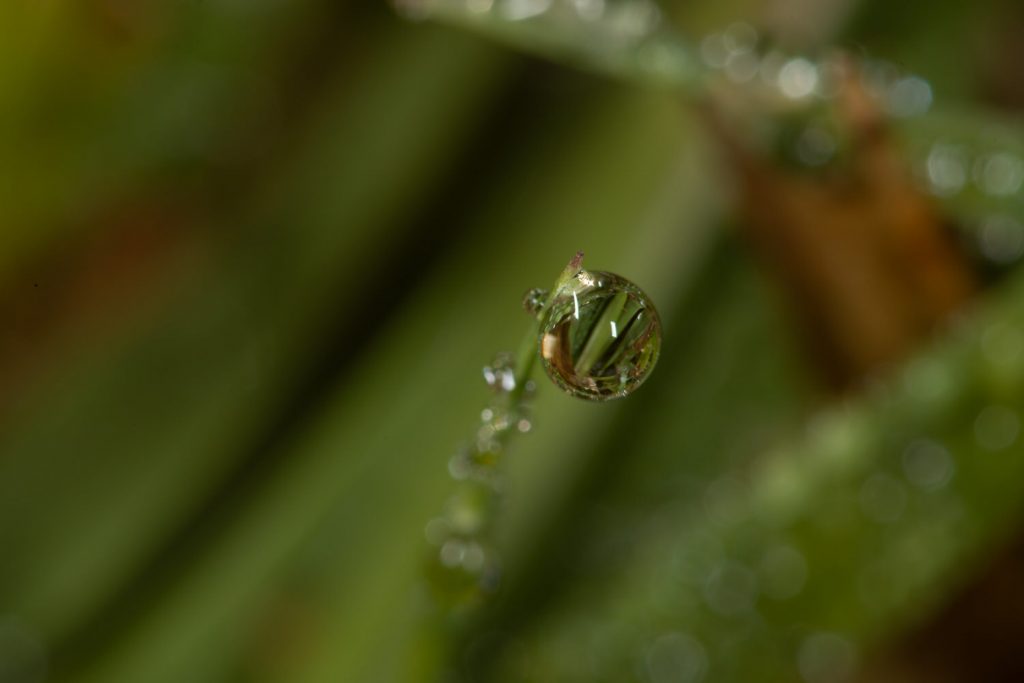
Before the edit, straight from the camera.
Step one: Get inspired by past edits
So first thing that I do for something like this is to see if I’ve got a Lightroom preset that suits it. I just like to see if I’ve got a Lightroom preset that kind of kicks it off, gives it a little bit of oomph and gives me some creative direction.
I’ve got all the Lightroom presets that I’ve made and I just go through them and see what each does. Chances are, you’ve edited a macro photography image before and maybe one of the presets you saved, if you did, could save you some time. Reusing presets from edits you’ve done before does a lot of that heavy lifting.
Once a preset is applied, I’ll change the edit from there. You use a preset to kick everything off and then you go into the details. At least that’s how I I’ve always done it. But you can do it any way that you want.
Sometimes when I create these Lightroom presets from scratch it’s because I don’t have a preset that already sort of meets the needs of the photo that I’m editing. That’s why I save previous edits I’ve done as presets and I have them on hand that I can go back and leverage later on to speed up my macro photography editing process.
Step two: Making edit changes from top to bottom
Then I just go through the editing pane on the right and make adjustments from top to bottom.
White balance
So I know the temperature’s okay on this. Maybe like a, bring it down just a little bit with the tint and maybe move it away from the greens. Just a little bit. Not too much though. You know, we don’t want it to be too green, but we don’t want it to be too pink either, but we want that little piece of dead grass in the background to give us a little bit of depth even though it’s out of focus. That’s okay. Because we’re going to use it in the end anyway, to isolate that drop in the foreground. So that looks all right.
Exposure and contrast
To me, the exposure looks fine. Let’s increase the contrast a little bit. The highlights are fine. Maybe I’ll like move them up just a little bit.
Texture
Let’s look at the texture, clarity and hazing. Even when I’m deciding how to edit macro photography work, I consider the texture because it’s all about the finer details. It’s looking okay. I think overall the texture is looking fine with this. I wouldn’t do too much, but maybe with the colour panel.
Colours
This slide here, this green to yellow change is gonna play a really key role. So we don’t want to make it too green. We don’t want it looking like a neon lizard, but we do want it to look pretty good. And then with the Aqua slider, we can sort of like have a little play with that as well.
Changing the green and aqua sliders doesn’t show too much change with that blade of a dead blade of grass at the back. Let’s use this little picker. So these little pickers on the side here, you can click on that. Then you can click on whatever colour you want and then drag down or up to change that specific colour.
Let’s change the colours of the dead leaf in the background to only make changes to that leaf to see how we can make it a little bit more red. If we wanted to hide it a little bit, we’d move it up. I’m just clicking and dragging.
If you change the greens using this method you’ll see, it just makes the photo a little bit too green. So that’s why we want to just bring the greens a little bit upwards and the reds down a little. We want it to be present, but we don’t want it to be competing with the drop at the front.
That’s looking all good, but maybe we want to darken it a little bit. We can do that by again, picking out little colour in the dead leaf, and we just want to bring the luminance of that dead piece of grass down just a little bit. I don’t want it to look super dead, but I do want it to emphasize how it’s not as healthy as, as the other bits in the photo.
If you wanted to do any, split toning, you could do that by maybe increasing the saturation on the highlights piece. Just a little bit, nothing major.
Sharpening and noise reduction
For this instance where we are talking about how to edit macro photography, sharpening the image is one of the most important bits to editing macro photography.
You hold down your option key or your alt key if you’re using a Windows machine to see what your sharpening will be applied to. Like the colours, you click and you drag along here, and what you see is it highlights the areas that the sharpening is going to be applied to. We kind of just want that the drop in focus to be sharpened. Let’s only apply the sharpening to that, which will be good because we are making such a subtle amount of sharpening to the image.
By holding our option key or alt key when applying sharpening we can easily see that it’s just going to be applied to that one section, which is great. You really need to be precise with your sharpening when thinking about how to edit macro photography because like I mentioned, details matter.
With the background, you can see there’s a bit of noise back there, which is fine. Like you’re going to get a little bit of noise. It’s natural. It’s, you know, especially on your lower end cameras, you’re going to see a lot more noise there.
I don’t think this is a problematic amount of noise in this macro photo, but what I’ll do is I’ll get rid of the noise just anyway, so we can see how it is applied. When you’re doing noise reduction, you can click on the little picker thing again to hover over a certain area and have it magnify on the side.
We’ll magnify an important area that needs to be sharp, which is the dewdrop. When you’re working on your photo or deciding how to edit macro photography work, being unclose to the finer details is really important.
Now we can see a really zoomed in version. So even when zoomed out you have a really close up view of an important area amount of detail there. So for the noise reduction, Let’s increase it just a little bit. Now with noise reduction, you don’t see that much changed in this box here until it applies it.
Even after we apply the the noise reduction all the way, it doesn’t soften it that much, because a lot of the photo is out of focus and only the foreground is in focus. So this might not be the best example, but I would avoid putting it any higher than say 30, with a macro photo, because like I said, some noise is inevitable.
Down a bit further on the editing pane, you’ve got some options that I don’t usually change. These options are for when you want to add grain and some more options I rarely alter.
Step three: Fix the composition
The last thing that I would do is I would do a little crop to fix the photo composition. I’ve moved the aspect ratio to a square.
I want the dead leaf in the background to be on one side and the healthy blades of grass to be on the left because that’s our point of contrast. By moving the healthy blade of grass to the right a a little bit, kind of like what the height to stand out on that blade of grass that’s coming up.
But it looks best in this instance if it’s roughly right in the middle so the viewer’s eye locks straight onto it.
The final image for the macro photography edit
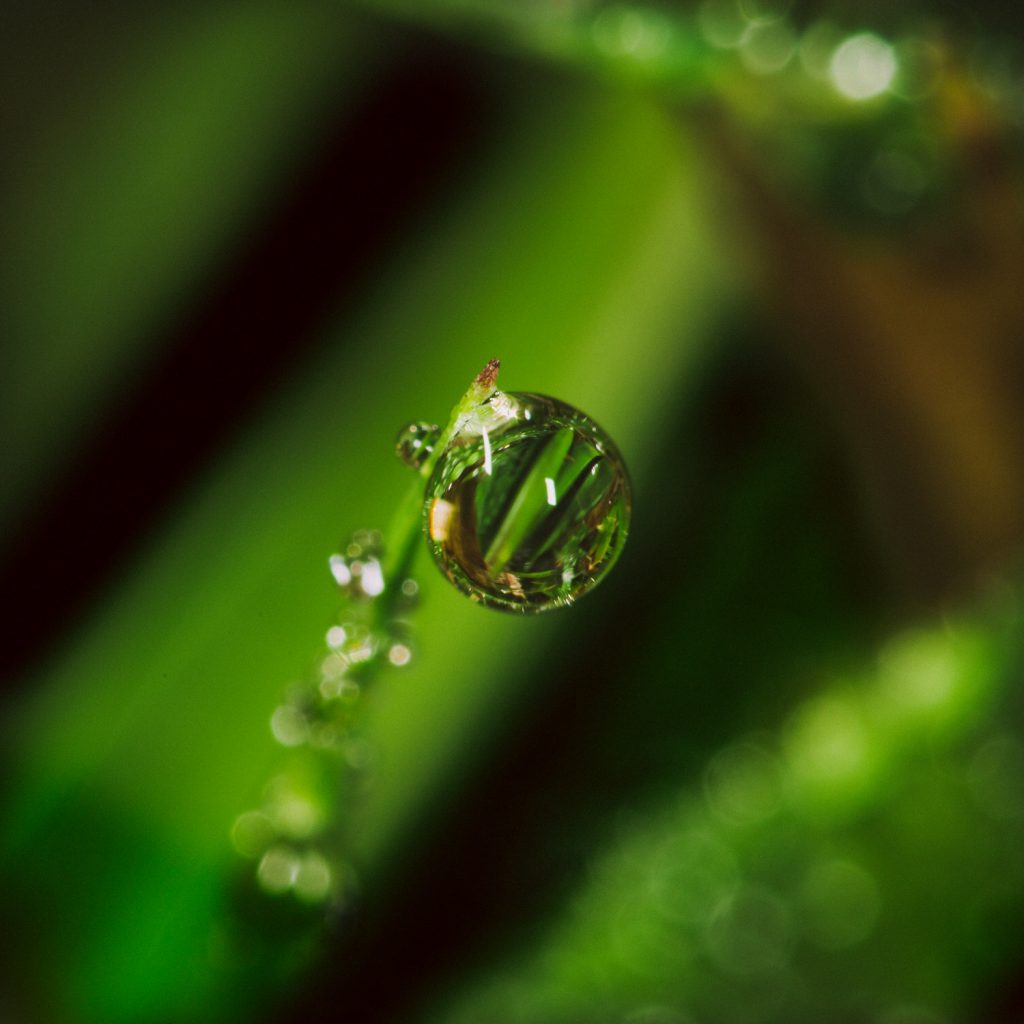
After the edit was made
Before and after comparison of the photo edit
I think that looks good. I hope you think it looks good as well. but let’s compare it. So I’ll duplicate that, and let’s do a before and after. So that is how we turned this photo into this. And theory is the left and the right split before and after. And we can also flip it top and bottom.
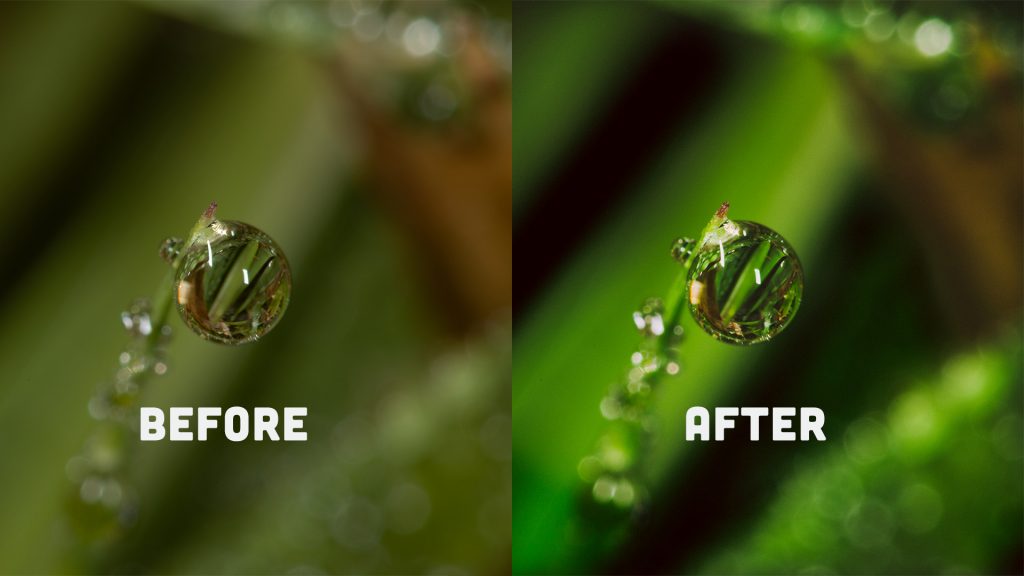
Before and after comparison
I think the final image looks a lot punchier, lot more green, but not too much green. I think that’s a much nicer looking photo. So that’s how I edited this macro photography photo of a dewdrop.
Get out there, give it a go. and show me, show me what you make.

